2. Installation(Beta)
This is a beta version for internal use only. Regular users should not operate it to avoid damaging the robot.
Please ensure:
- Stable connection between your personal computer and the robot's Orin device via Ethernet cable or Wi-Fi (Ethernet direct connection is recommended for file transfer as it's faster, 100M/s)
- The 192.168.41.1 and 192.168.41.2 devices are both connected to the public internet and can download related files
- Storage space: Reserve at least 15GB of available space
You can refer to the Installation Document, from which this document is also summarized. It is recommended to first briefly review this document, then refer to the Installation Document when encountering issues.
1. File Transfer
- Tien_install.tar.gz
- dist.zip
- tien_project.zip
- libcompressed_depth_image_transport.so
- rvl_codec.hpp
Transfer the above 5 files to the Orin board of 41.2, place them directly in the ~/ directory for future use.
2. SSH to Orin board and execute extraction
cd /home/nvidia
tar -xvf Tien_install.tar.gz
rm -rf Tien_install.tar.gz
3. Replace wheel package
Replace manipulation_framework-0.1.0-py3-none-any.whl:
# First extract dist.zip
unzip dist.zip
# Then perform replacement
rm -rf ~/Tien_install/pkgs/manipulation_framework-0.1.0-py3-none-any.whl && mv ~/dist/manipulation_framework-0.1.0-py3-none-any.whl ~/Tien_install/pkgs/
4. Execute overall installation
cd ~/Tien_install
bash tien_install.sh
After execution, you will see the following output:
===================================================
TienKung/TienYi Manip Installation Script
===================================================
说明:
1. 请确保 ./pkgs 下包含所需安装包
2. 请确保 ./requirements.txt 存在
3. 安装过程中会请求 sudo 权限,需要手动输入密码
4. 推荐在主环境安装后安装XROCS

选择步骤 (空格分隔,如 '1 2' 或 'a'):
1) 安装 Miniconda
2) 安装主环境(manip)
3) 安装 XROCS
4) 安装 XARM (x86)
a) 全部执行

输入:
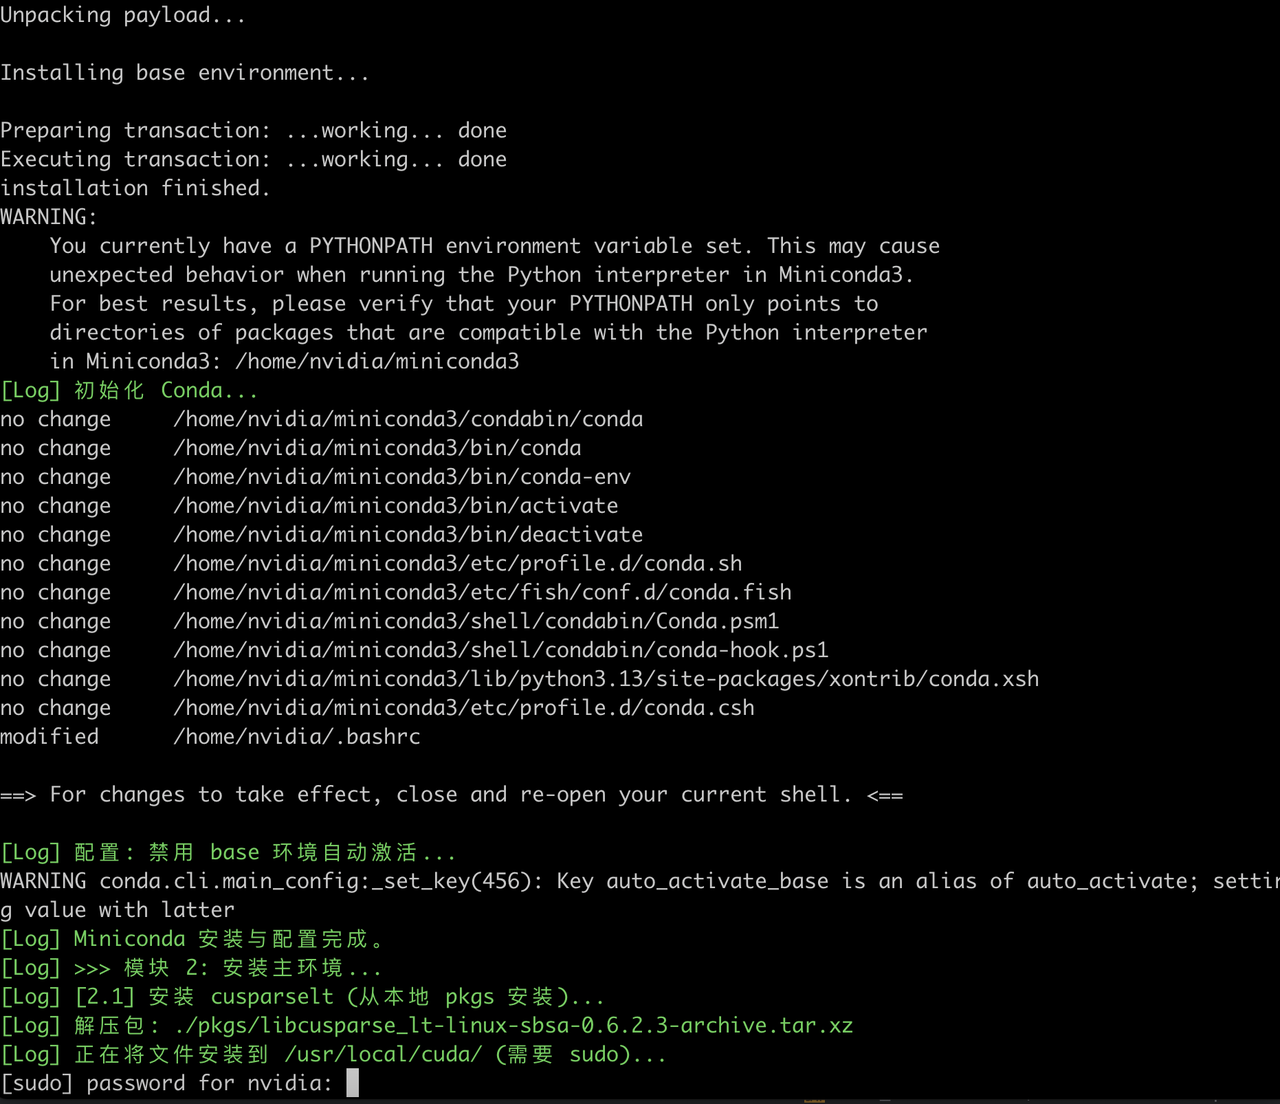
For a new machine's first installation, simply input 'a' and press Enter for full installation. The process is lengthy, so pay attention to the command line output. Sometimes installation confirmation will be required. When installing XARM, you will be prompted to enter the x86 board password (123).
Please note that sometimes when directly inputting 'a' for full installation, the XARM installation on x86 may not succeed. In this case, you may need to run the installation script again, directly input '4' to install XARM.
5. Test XARM installation success
SSH to the x86 board and execute the following command to check if the nodes can run properly without errors:
cd ~/XARM
source ~/XARM/install/setup.bash
ros2 launch tiangong2pro_bringup tiangong2.launch.py | tee runlog
If the nodes exit without errors, it indicates that the XARM installation on the x86 board is successful. If there are errors, it might be because some packages are not installed on x86. You can manually install the following packages to try fixing:
sudo apt --fix-broken install
sudo apt install ros-humble-octomap-server ros-humble-xacro ros-humble-backward-ros ros-humble-realtime-tools
After installation, try running the above nodes on x86 again.
If there are still errors, go back to step 4, execute the installation script on the Orin board, then input '4' to install XARM separately.
6.1 Test camera topics
On the Orin of 41.2, start the camera service separately (only to check if a certain topic exists after the camera service starts):
# Start a new terminal to execute this command
source ~/orbbec_camera_ros2/install/setup.bash
ros2 launch orbbec_camera gemini_330_series.launch.py
Check if the /camera/color/image_raw/compressed topic exists:
# Start another new terminal to execute this command
source ~/orbbec_camera_ros2/install/setup.bash
ros2 topic list|grep camera
Visually determine if the /camera/color/image_raw/compressed topic exists. If it exists, exit this terminal and use Ctrl+C to stop the camera service. Ignore the subsequent operations in this step, close all services and terminals opened in this step, and directly jump to Step 6.2 below.
If it does not exist, first transfer the downloaded libcompressed_depth_image_transport.so and rvl_codec.hpp files to the ~/ directory of the Orin board of 41.2, then execute:
# Open a new terminal to install image-transport library
export ROS_DISIRO=humble
sudo apt install libgflags-dev nlohmann-json3-dev ros-$ROS_DISIRO-image-transport ros-$ROS_DISIRO-image-transport-plugins ros-$ROS_DISIRO-compressed-image-transport ros-$ROS_DISIRO-image-publisher ros-$ROS_DISIRO-camera-info-manager
# Open another new terminal to copy files to the specified directory
sudo cp ~/rvl_codec.hpp /opt/ros/humble/include/compressed_depth_image_transport/
sudo cp ~/libcompressed_depth_image_transport.so /opt/ros/humble/lib
Open another new terminal and check if the /camera/color/image_raw/compressed topic exists according to the above steps.
If the topic exists, close all services and terminals opened in this step.
6.2 Set camera intrinsic parameters
Still on the Orin of 41.2, start the camera service separately:
# Start a new terminal to execute this command
source ~/orbbec_camera_ros2/install/setup.bash
ros2 launch orbbec_camera gemini_330_series.launch.py
Then execute in a new terminal:
source ~/orbbec_camera_ros2/install/setup.bash
ros2 topic echo /camera/color/camera_info
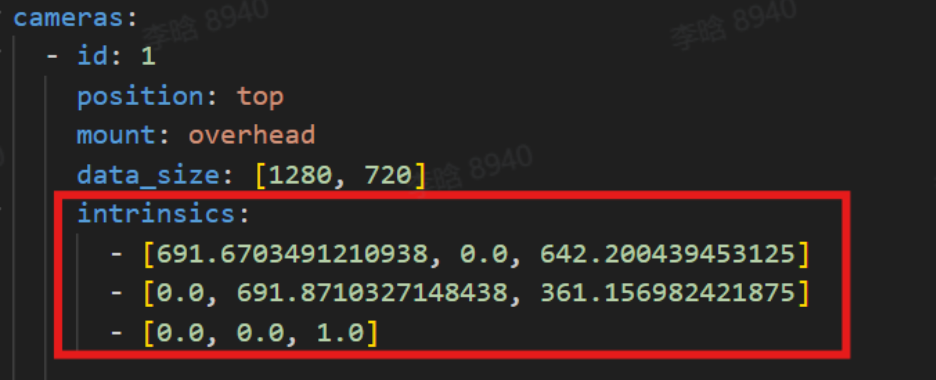
Take the k value from the output, similar to the following:
k:
- 691.6703491210938
- 0.0
- 642.200439453125
- 0.0
- 691.8710327148438
- 361.156982421875
- 0.0
- 0.0
- 1.0
Extract executable program
cd ~ && mkdir tien_project && mv tien_project.zip tien_project && cd tien_project && unzip tien_project.zip
Modify the following file:
~/tien_project/manipulation_framework_apps/config_skill/robot_env/tienkung_v2/camera_config.yaml
Arrange the 9 values of the intrinsic parameter "k" into a 3x3 matrix and fill them into the intrinsics section of this file:
7. DOMAIN_ID check
If there is only one TienKung machine under the same Wi-Fi, you can skip this step.
If there are multiple TienKung machines, you need to set different DOMAIN_ID for each TienKung machine. There are two files to modify:
~/tien_project/start_process/start_tienkung2pro.sh
~/tien_project/start_process/start_server.sh
These two scripts contain the DOMAIN_ID variable, both default to 56. For example, if there are TienKung A, TienKung B, and TienKung C, all connected to the same Wi-Fi, you can set them as follows:
- For TienKung A, keep both files unchanged, maintaining the default 56
- For TienKung B, modify the DOMAIN_ID variable in both files to 57
- For TienKung C, modify the DOMAIN_ID variable in both files to 58 And so on.