6. Operation Guide
Note: Please contact customer service for the login password in this section.
6.1 Unboxing Guide
6.1.1 Unboxing Inspection
-
The robot is packaged in an air cargo case with external dimensions of 1850×780×500mm (length×width×height).

-
After the robot is shipped to the user site, please inspect the air cargo case and ensure it is intact. If damaged, contact the logistics company and supplier immediately;
-
After confirming no issues, rotate the butterfly locks to open the two square locks on the side;
-
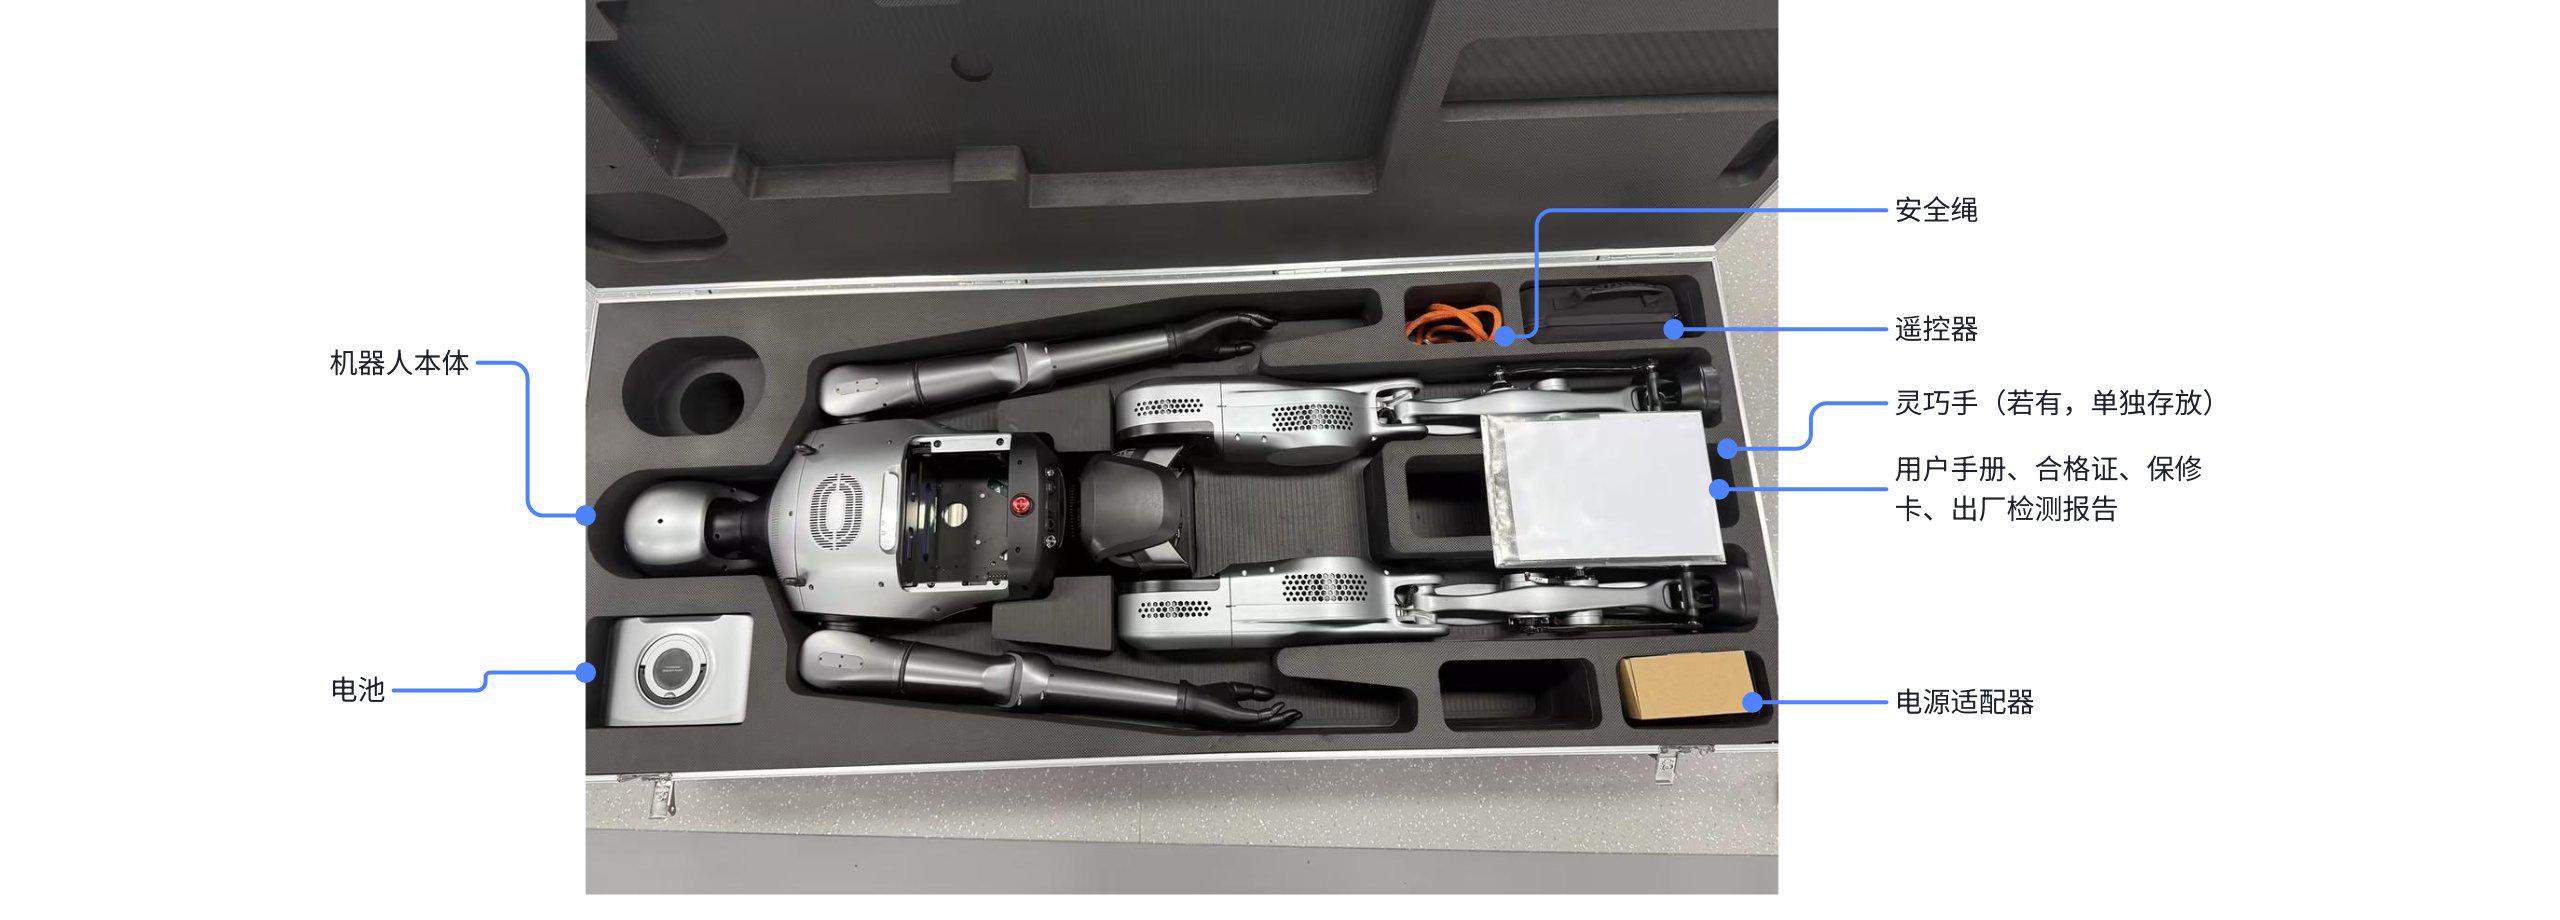
Open the air cargo case. The contents are shown in the image below. Please verify the contents according to Section 3. Packing List and contact after-sales for replacement if anything is missing.
6.1.2 Removing the Robot
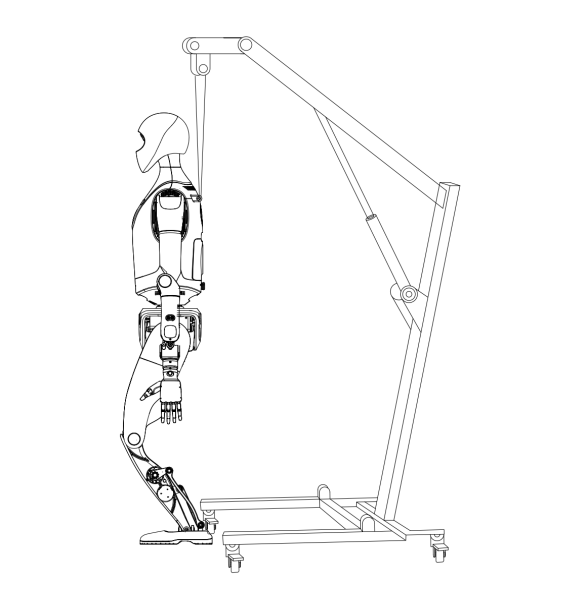
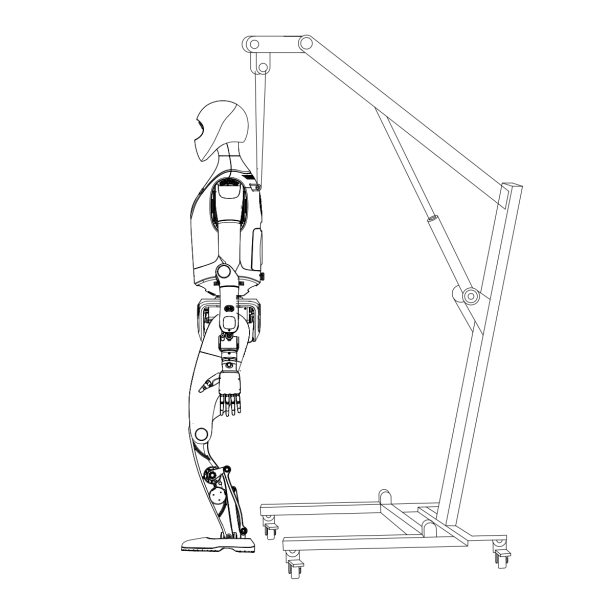
-
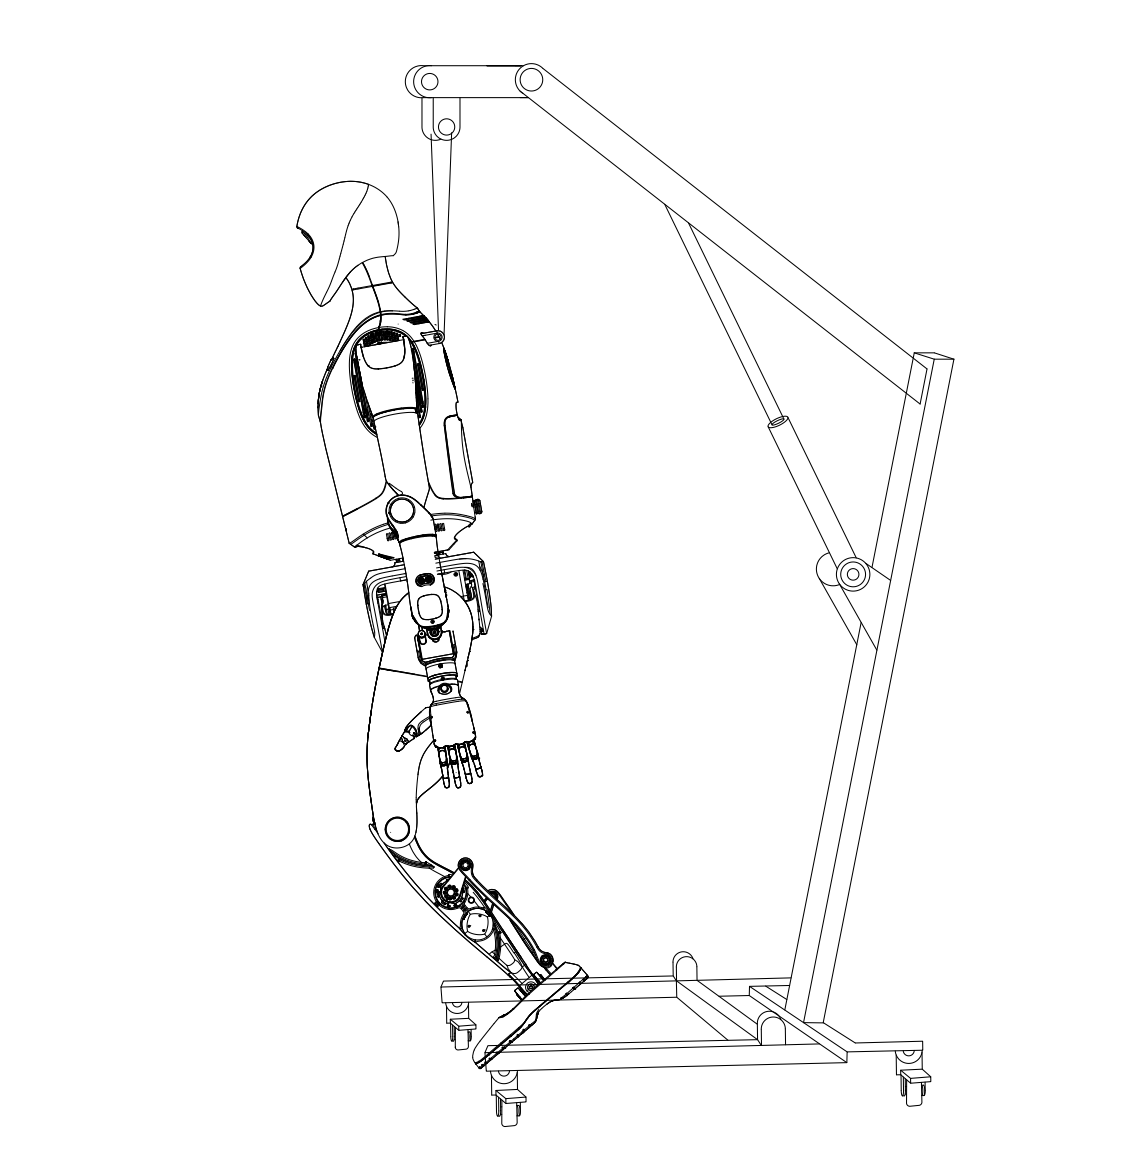
Attach the safety hook of the safety rope to the fixed lifting ring under the robot's rear neck and connect the rope to the protective frame;
-
Slowly raise the protective frame to lift the robot. During lifting, pay attention to each joint position, and if necessary, have personnel assist and support to ensure smooth lifting;
-
Manually place the robot's feet on the edge of the air cargo case;
-
Gently push the cargo case forward to lift the robot onto the protective frame.
Note: After removing the robot, do not discard the transportation case as it is specifically designed for transporting the robot and its accessories.
6.2 Pre-use Preparation
6.2.1 Environment Inspection
-
The ground must be level and non-slippery. Do not use on uneven, steep, muddy, loose-material, or slippery surfaces. Recommended free activity space of at least 4m in all directions;
-
Environmental temperature and humidity: Working temperature 0~30 ℃, relative humidity below 75% RH;
-
The environment must be free of flammable or corrosive liquids or gases, and there should be no strong electronic noise or magnetic fields nearby.
6.2.2 Robot Inspection
-
Confirm the robot is suspended from the frame;
-
Check if all parts are loose or damaged. Ensure smooth movement with no jamming;
-
To confirm sufficient battery charge, first ensure the robot is powered (see 6.3 Starting the Robot). You can then check battery charge by:
- Observing the battery status light on the front abdomen (see 5.2 Status Light Description for light-battery correlation)
- Checking the top right corner of the 7.1 Robot Status page in the diagnostic page
-
Turn on the remote control and confirm sufficient battery charge. Specific steps:
-
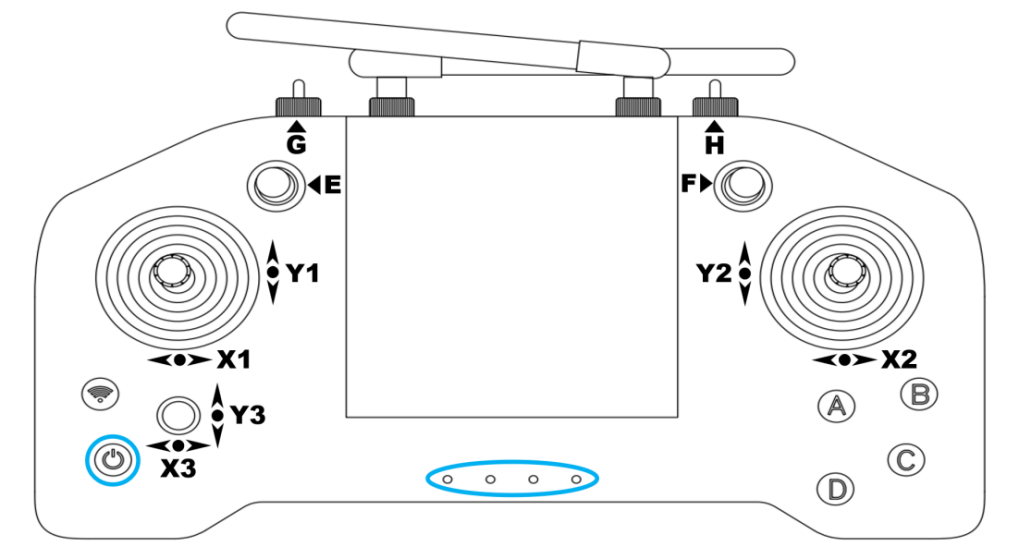
As shown in the image, short press then immediately long press the power button on the remote control;
-
The indicator light at the bottom center of the remote control will illuminate. From left to right, they indicate the remote's battery status: 1st, 2nd, 3rd, 4th lights correspond to 25%, 50%, 75%, 100% charge respectively.
6.3 Starting the Robot
After powering on, the robot automatically starts and enters service-waiting mode. Specific steps:
-
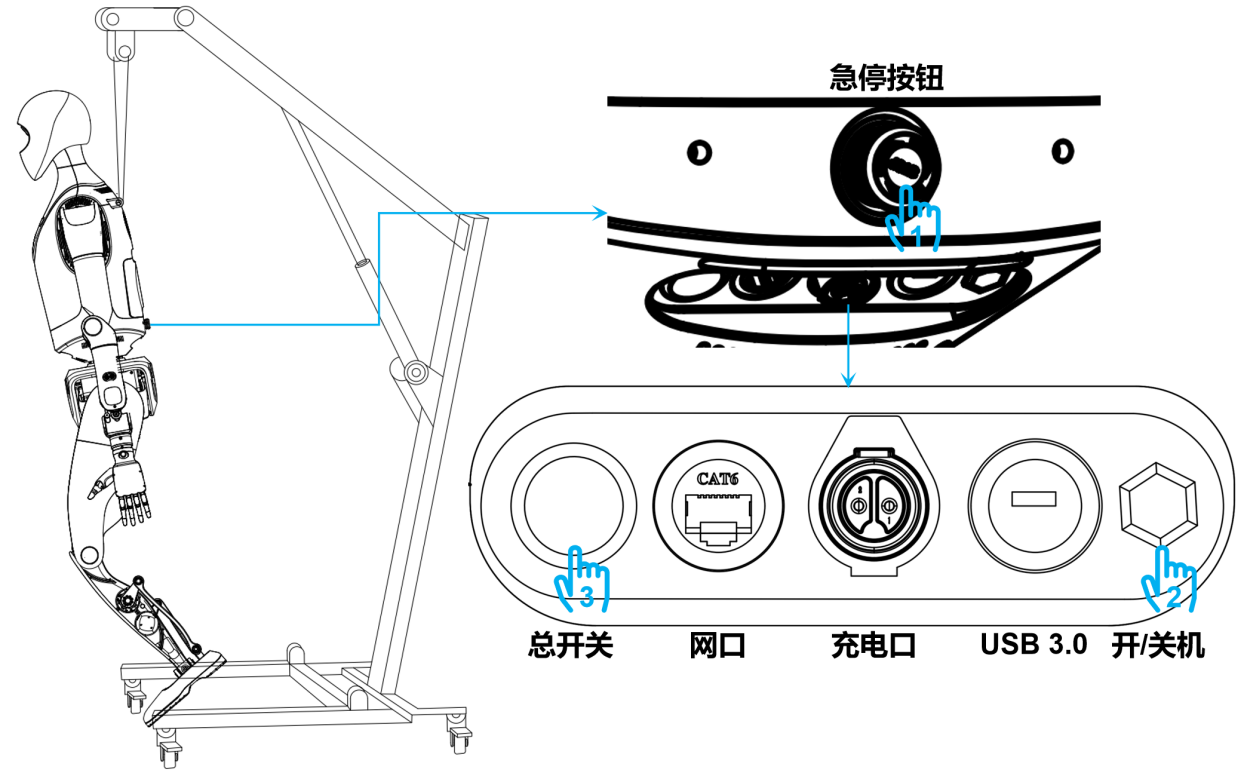
Press the main power button
- Power button indicator: turns blue
-
Press the power button
- Power button indicator: turns red
-
Confirm counterclockwise rotation of emergency stop button until popped out
- Overall status light: Off → White → Rainbow → Blue-green breathing, indicating wake-up; successful wake-up produces a long tone. Status light enters blue-green breathing mode
- Battery status light: Synchronously displays current battery (blue-green)
-
Automatically enters service-waiting mode, robot can now be started via remote
- Overall status light: Blue-green (slow breathing)
-
Press remote A button to start self-check
- Overall status light: Rainbow flash once → Blue-green (rapid breathing)
-
Self-check Results
- Success:
- Overall status light: Blue-green (solid); Robot emits short tone
- Enters Ready state (operable)
- Failure:
- Overall status light: Red (flashing)
- Auto-retry after 20 seconds

Note: Do not move the robot during self-check. - Success:
6.4 Control Board Login and Connection
Currently, the Walker Tienkung series robot control board can comprise up to three parts: x86 main controller, Orin1, and Orin2. The username and static addresses for each are shown in the table below. After Wi-Fi configuration, you can remotely connect to the robot via ssh commands. Users can configure Wi-Fi for each control board separately based on their needs.
| Control Module | Username | Static Address | Wi-Fi | Compatible Devices |
|---|---|---|---|---|
| x86 Main Controller | ubuntu | 192.168.41.1 | Independent Wi-Fi | Walker Tienkung/Voice & Vision/Embodied Intelligence |
| Orin1 | nvidia | 192.168.41.2 | Independent Wi-Fi | Walker Tienkung·Voice & Vision/Embodied Intelligence |
| Orin2 | nvidia | 192.168.41.3 | Independent Wi-Fi | Walker Tienkung·Embodied Intelligence |
The following steps use the x86 motion controller as an example:
Wi-Fi Configuration Steps
-
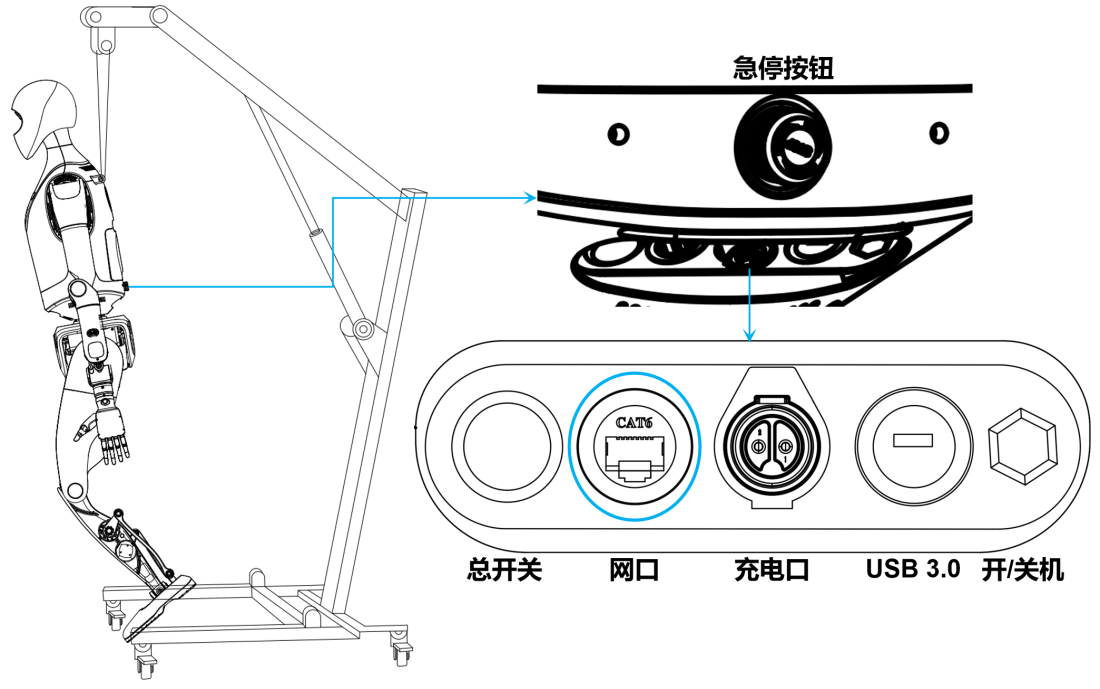
Connect the debug Ethernet port on the robot's back to your computer using an Ethernet cable;
-
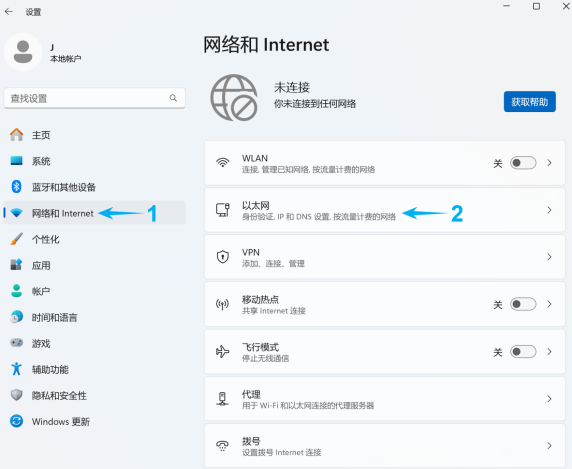
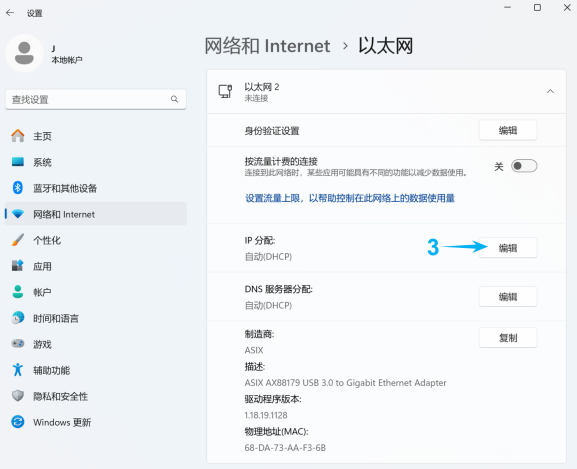
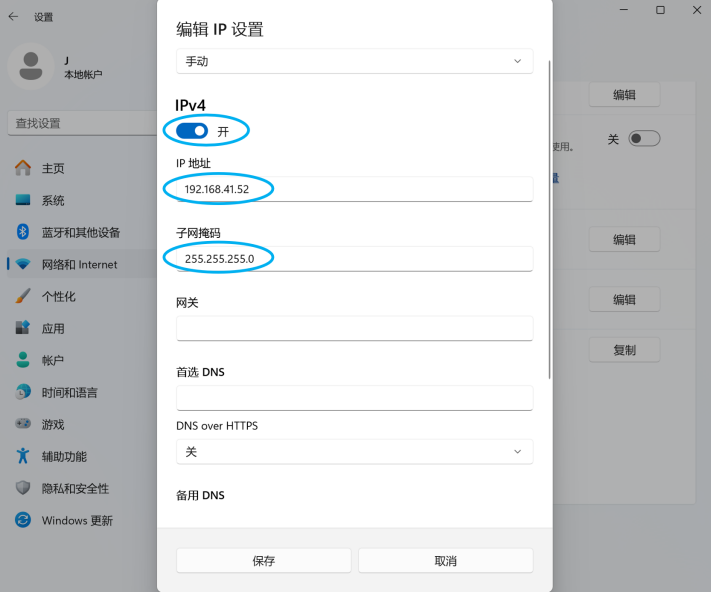
Configure your computer's Ethernet port address to 192.168.41.xx/255.255.255.0 (Windows example shown below):
-
Open Settings, click "Network & Internet", then "Ethernet", then "Edit" next to IP assignment;
-
Enable IPv4 and configure IP to 192.168.41.xx with subnet mask 255.255.255.0;
-
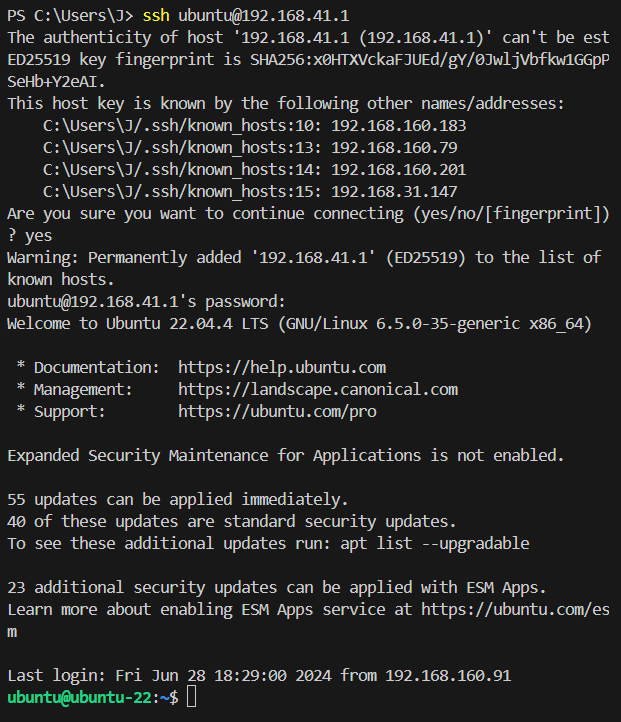
Open terminal and enter: ping 192.168.41.1. If shown below, network connection is normal and you can proceed to login;

-
In terminal, enter: ssh ubuntu@192.168.41.1, then type yes and password. If shown below, login to x86 controller was successful;
-
In the same terminal, enter the following command to view available Wi-Fi networks and note the SSID you want to connect to:
sudo nmcli device wifi list -
Connect to the Wi-Fi network using its SSID and password:
sudo nmcli device wifi connect 'Wi-Fi SSID' password 'Wi-Fi Password' -
Enter the following command to view wireless interface configuration and status. Confirm successful connection. Wi-Fi configuration is now complete; you can unplug the Ethernet cable:
ifconfig
Wi-Fi Connection Steps
After Wi-Fi configuration is complete, subsequent robot connections via Wi-Fi to the x86 controller:
-
Open terminal on your computer and enter: ifconfig. Note the IP address configured for the wireless interface (wlan0/wlp2s0);
-
Enter: ssh ubuntu@x.x.x.x to connect to the x86 controller (replace x.x.x.x with the IP from step 1). Type yes and password to connect successfully.
6.5 Landing and Standing
Operation steps:
-
Press the "D" key on the remote to zero the robot to initial position;
Note: The robot must be secured to the protective frame before pressing "D". -
Slowly lower the protective frame to place the robot on the ground, maintaining vertical position for 60 seconds;
-
Confirm the remote's "H" joystick is at center position, then long press "A" to make the robot stand. After standing, observe whether the robot is balanced. If no trembling or tilting, it's balanced. If unbalanced, repeat the above steps.
6.6 Basic Action Operation Guide
| Note: It's recommended to use the robot with protective frame support. |
|---|
Reinforcement Learning Motion Control Mode Operations
6.6.1 Movement Mode Switching
-
Start Stepping Mode
- Confirm robot is standing;
- Move remote "H" joystick from center left and back to center. Robot enters stepping mode.
-
Switch to Running Mode
- While robot is stepping smoothly, move remote "H" joystick from center right and back to center. Robot switches to running mode.
6.6.2 Movement and Turning Control
In stepping or running mode, use the remote joysticks to control movement and rotation. Joystick deflection determines speed:
- Move left joystick up/down: Control forward/backward movement
- Move left joystick left/right: Control side-to-side movement
- Move right joystick left/right: Control counterclockwise/clockwise rotation
6.6.3 Stop and Return to Standing
-
In stepping mode:
- Confirm remote "H" joystick is at center, then long press "A". Robot stops and returns to standing.
-
In running mode:
- First move remote "H" joystick from center left and back to center to switch to stepping mode;
- Confirm remote "H" joystick is at center, then long press "A". Robot stops stepping and returns to standing.
| Note: Never press or long press "A" directly in running mode. |
|---|
6.7 Emergency Stop Methods
| Note: Without protective frame, emergency actions may cause the robot to fall. Operate carefully. |
|---|
-
Stiffen (僵停): Press remote "C" immediately in these situations. All joints stiffen immediately; body cannot maintain balance. Need impact protection; support robot quickly:
- Robot movement abnormal: Incorrect speed or direction;
- Predicted risk: Robot approaching obstacles/people unable to stop in time.
-
Joint Disable: In emergencies, move remote "G" joystick right and press "C". Joints lose power; robot cannot maintain any posture, collapses immediately:
- Robot sudden fault: Sensor or electronic element abnormality;
- Robot posture unstable: Robot in unsafe position/angle, may fall.
-
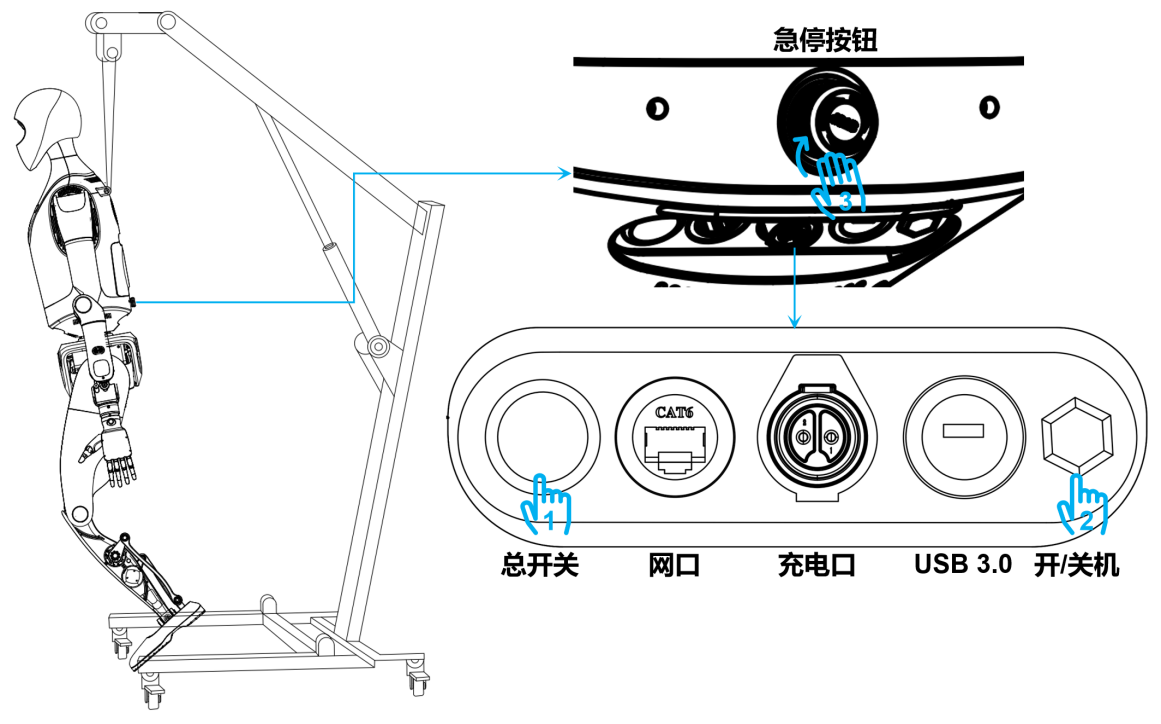
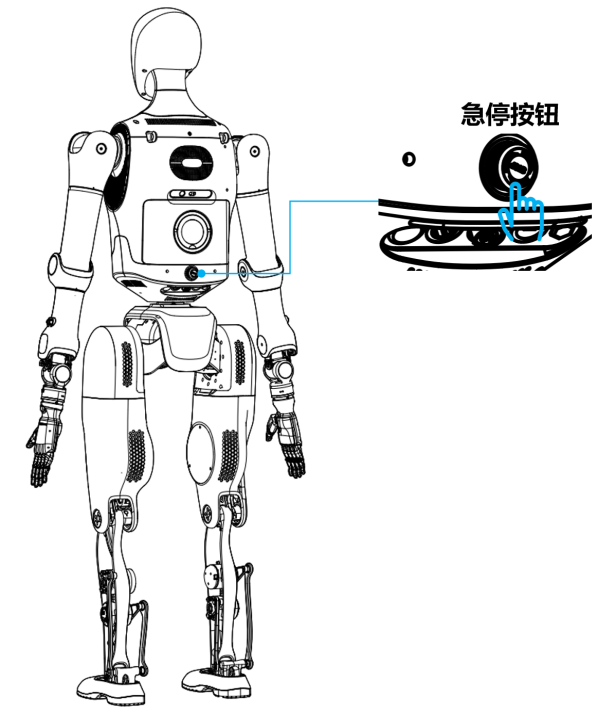
Emergency Stop Button: In critical situations, immediately press emergency stop button on robot's back, long press power button for 6 seconds, then toggle main power to cut all power. Robot cannot maintain posture, collapses immediately.
After emergency stop power cut, restart robot from 6.3 Starting the Robot.
- Robot smoking or burning smell;
- Water or foreign objects entered robot;
- Robot out of control, cannot stop via remote or other means;
- Robot damaged, may cause further danger;
- Emergency evasion needed: High-altitude work or dangerous environment loss of control;
- External environmental emergency: Earthquake, fire, etc.
Through the above emergency operation guide, you can quickly take action in various emergencies to ensure robot and environmental safety.
6.8 Shutting Down the Robot
Follow these steps to shut down the robot:
-
Confirm robot has stopped and returned to standing;
-
Press remote "C" to stiffen the robot;
-
Secure robot to frame and lift it;
-
Press emergency stop button;
- Power button indicator: turns red
-
Long press power button for 6 seconds;
- Power button indicator: turns blue
-
Press main power button to turn off all indicators;
-
Short press then long press remote power button to turn off remote.
6.9 Packing the Robot
To pack the robot, follow these steps:
-
Ensure robot is powered off and properly suspended from frame.
-
Orient the cargo case to match robot orientation.
-
Lower the frame and place robot legs in the cargo case, ensuring contact with protective foam.
-
Remove safety rope; place robot upper body and head in case, ensuring foam contact. Adjust arm orientation during placement. For dexterous hand transport, recommend removing it per factory configuration, placing in dedicated transport package, then into cargo case.
-
Close the cargo case and rotate butterfly locks to secure the square locks.
6.10 Battery Charging
6.10.1 Charging Notes
-
Direct robot charging only. Power off robot completely before charging; unplug immediately after full charge to avoid prolonged connection;
-
Charging environment: Temperature 0~30℃, humidity below 75% RH;
-
Use only the original charger provided by the Company. Third-party power supplies are forbidden;
-
Store spare battery packs in dedicated fireproof battery cabinets;
-
Recommend charging after robot cools to room temperature;
-
If smoke, smell, overheating, or deformation occurs during charging, immediately unplug and stop using;
-
If battery fluid contacts eyes, immediately rinse with water and seek medical attention.
6.10.2 Charging Methods
6.10.2.1 Direct Robot Charging
-
Connect power adapter to outlet.
-
Insert charging cable into charging port.
-
Adapter indicator light shows red - charging in progress. Indicator turns green when battery is full; stop charging immediately to avoid overcharge.
6.10.2.2 Battery Compartment Swap
-
Prepare backup battery pack.
-
With robot powered off, rotate battery compartment lock right and remove battery pack.
-
Insert replacement battery pack, rotate lock right, push battery into compartment, return lock to normal position. Battery installation successful.
6.10.2.3 Battery Pack Charging
-
Connect power adapter to charging outlet.
-
Connect adapter to battery pack. Red light on adapter means charging in progress. Green light indicates full charge; stop charging to prevent overcharge.