8. Unboxing Guide
Please contact customer support to obtain the login passwords mentioned in this chapter.
Unboxing Inspection
- The robot is packaged in a flight case with external dimensions of 1850 × 780 × 500 mm (L × W × H).
- After the robot is delivered to the user site, inspect the flight case and ensure that the case is intact. If there is any damage, please contact the logistics company and your local supplier in a timely manner.
- After confirming that the case is undamaged, rotate the butterfly latches to open the two square locks on the side.
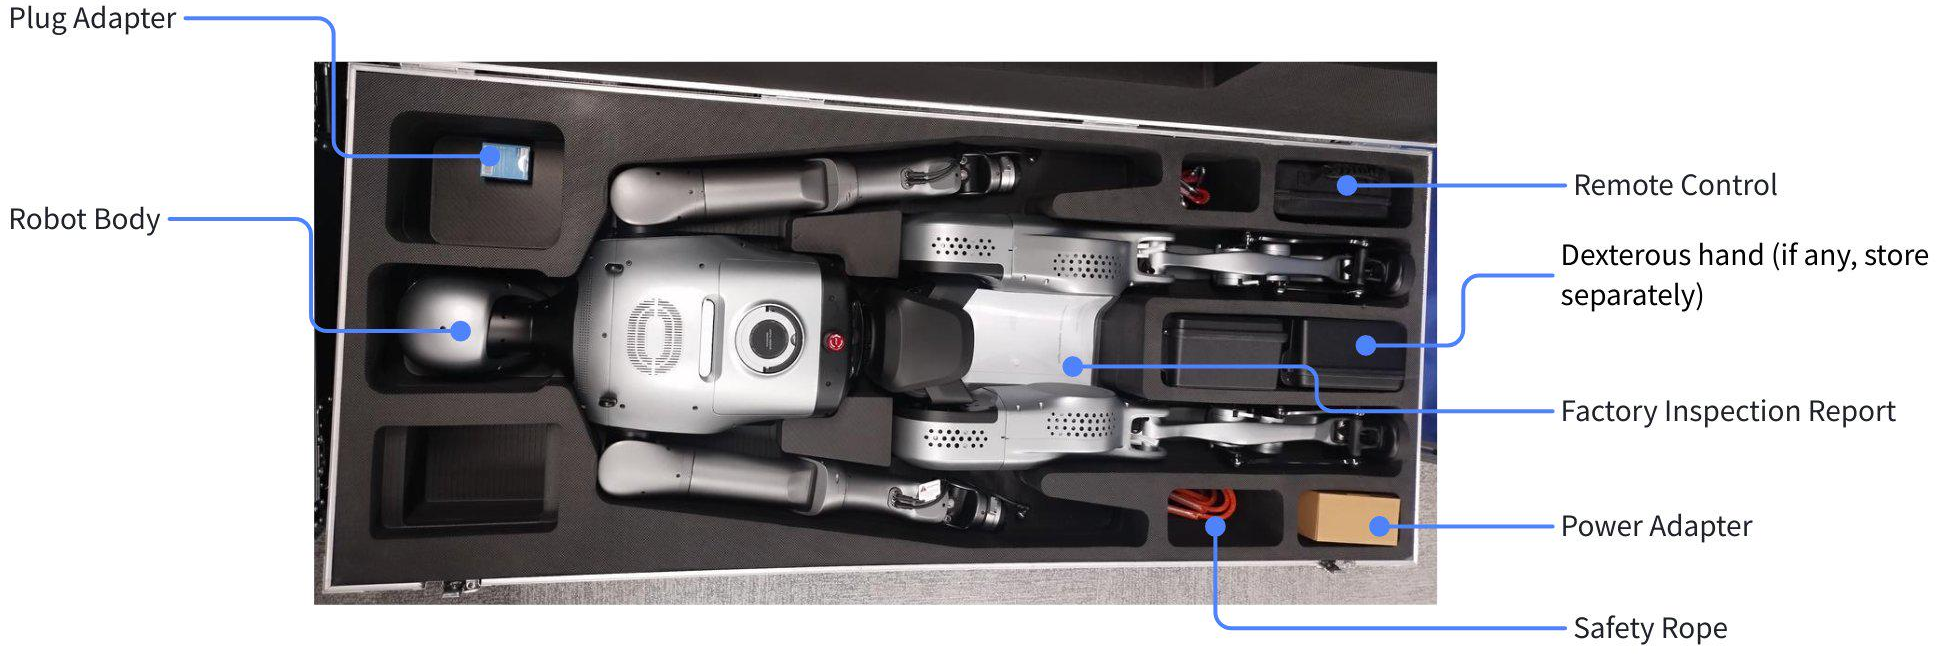
- Open the flight case. The internal contents are as shown below. Check the items against the 3. Packing List. If anything is missing, please contact after‑sales support for replacement.
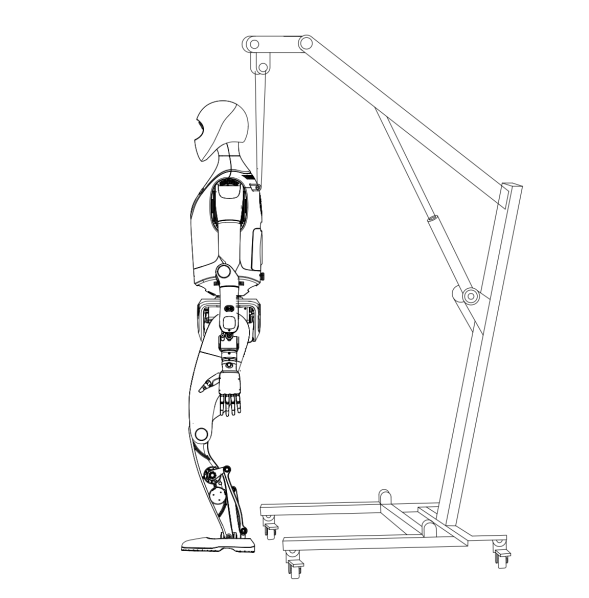
Removing the Robot from the Case
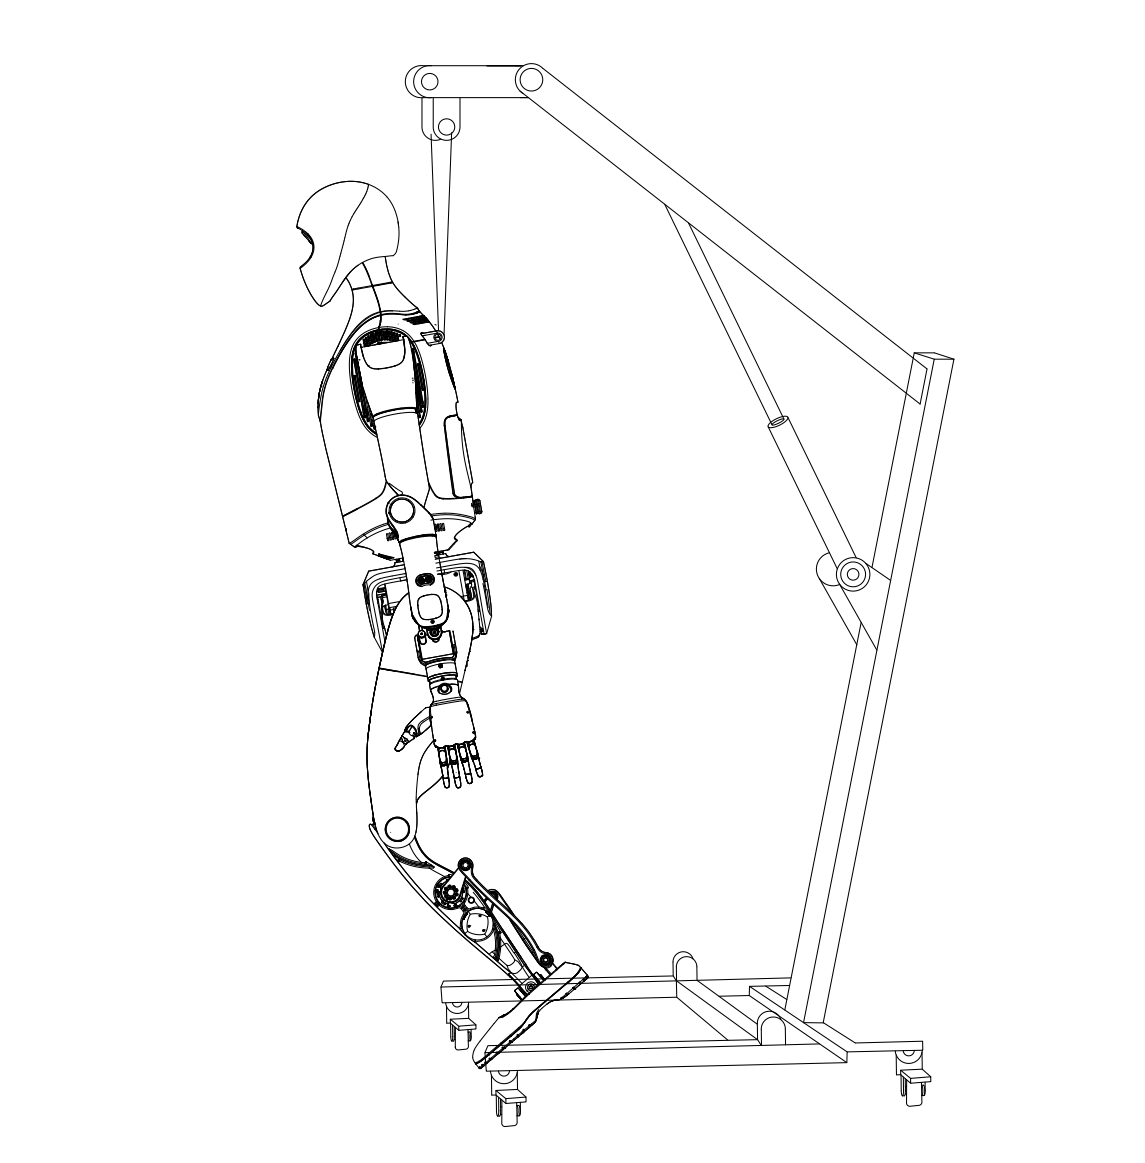
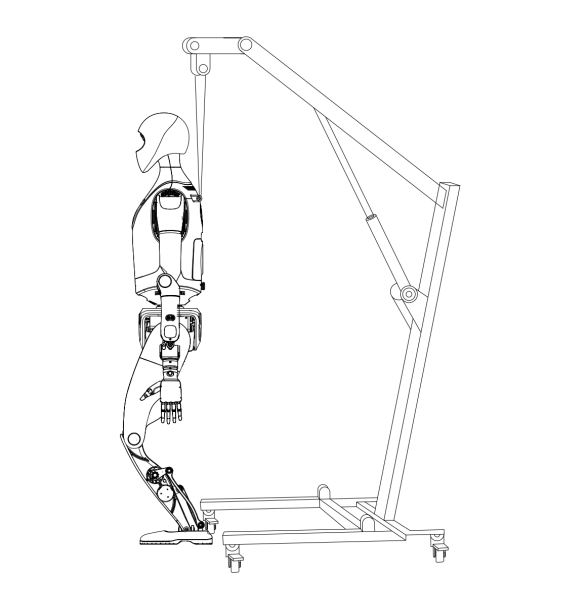
- Attach the safety hook of the safety rope to the fixed lifting ring under the back of the robot’s neck, and connect the safety rope to the protective stand.
- Use the protective stand to slowly lift the robot. During lifting, pay close attention to the positions of each joint. If necessary, assign personnel to support the robot’s limbs to help it rise smoothly.
- Manually place the robot’s feet on the edge of the flight case.
- Gently push the flight case forward so that the robot is fully transferred to the protective stand.
After removing the robot, do not discard the transport flight case. It is specifically designed for transporting the robot and its accessories.
Preparations Before Use
Environment Check
- The floor should be flat and non‑slippery. It is not recommended to operate the robot on uneven ground, steep slopes, muddy or loose surfaces, or slippery floors. It is recommended to reserve at least 4 m of free space around the robot.
- Environmental temperature and humidity requirements: operating temperature 0–30 ℃, relative humidity ≤ 75% RH.
- The environment must be free of flammable or corrosive liquids and gases, and there must be no strong electromagnetic noise sources or magnetic fields nearby.
Robot Check
- Confirm that the robot is suspended on the stand.
- Check whether any parts are loose or damaged, and ensure that all joints move smoothly without jamming.
- To confirm that the robot battery is sufficiently charged, first make sure the robot is powered on (see Starting the Robot), then check the battery level using the following methods:
- Observe the length of the Battery Status Light on the front abdomen (see Section 6. Status Indicator Lights for the mapping between light pattern and battery level).
- On the diagnostics page, check the detailed battery level at the top‑right corner of the Robot Status page.
- Power on the remote controller and check its battery level as follows:
- As shown in the illustration, short‑press and then immediately long‑press the power button on the remote controller to turn it on.
- The indicator lights at the bottom center of the controller will light up from left to right, indicating the controller’s battery level. When 1/2/3/4 lights are on, the corresponding levels are 25% / 50% / 75% / 100%.
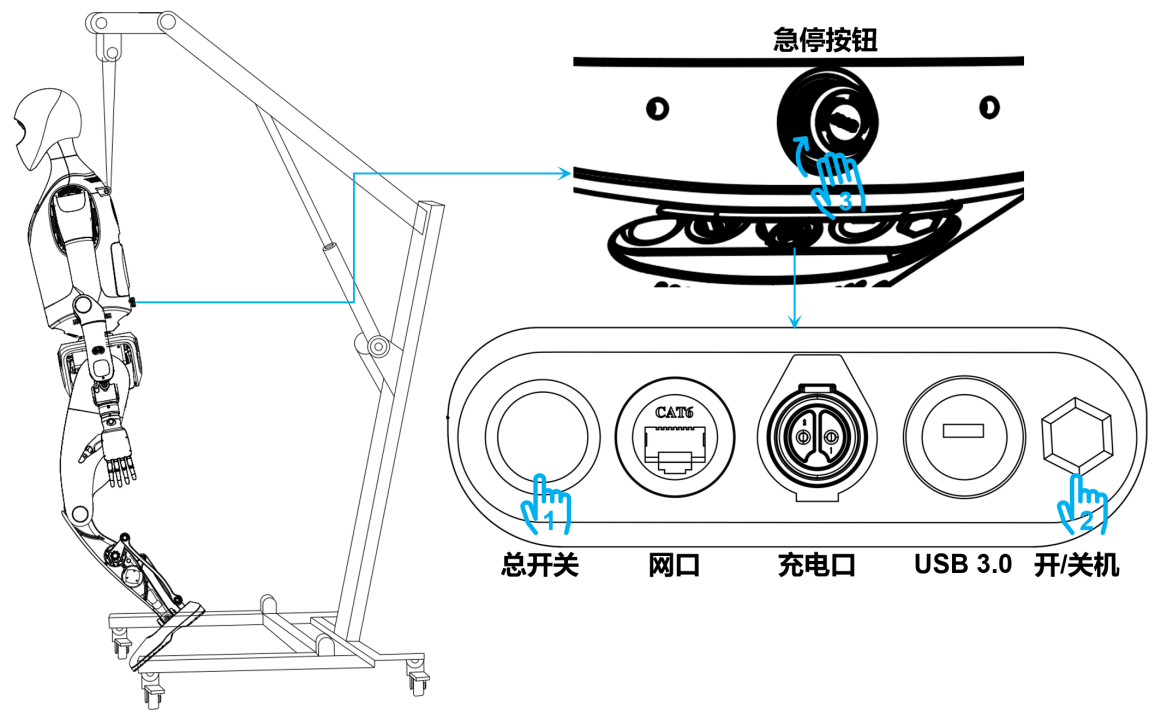
Starting the Robot
After power‑on, the robot automatically completes system startup and enters the service waiting state. The detailed steps are:
| Step Action | Light and Audio Indications |
|---|---|
| 1. Press the main power switch | Power On/Off button indicator turns blue |
| 2. Press the Power On/Off button | Power On/Off button indicator turns red |
| 3. Rotate the emergency stop button clockwise until it pops out | Waking up: System Status Light: off → white → rainbow → blue‑green breathing; Wake‑up success: a long chime is played, and the status light enters blue‑green breathing state. |
| 4.1 Automatically enters service waiting state; the robot can now be started via the remote controller | System Status Light: blue‑green (slow breathing) |
| 4.2 Short‑press the A button on the remote to start self‑check | System Status Light: rainbow flash once → blue‑green (fast breathing) |
| 4.3 Self‑check result | Success: System Status Light: blue‑green (steady on); a short chime is played and the robot enters the Ready state (operational). Failure: System Status Light: red (blinking), auto‑retry after 20 s. |
Note: Do not move the robot during self‑check.
Main Controller Login and Connection
The Walker Tienkung series robot may contain up to three main controller boards: x86 controller, Orin1, and Orin2. The usernames and static IP addresses are shown below. After Wi‑Fi configuration, you can use SSH to connect to the robot. Wi‑Fi can be configured separately for each main controller as required.
| Controller Module | Username | Static Address | Wi‑Fi | Configuration Target |
|---|---|---|---|---|
| x86 controller | ubuntu | 192.168.41.1 | Dedicated | Walker Tienkung / Walker Tienkung · Voice & Vision / Walker Tienkung · Embodied Intelligence |
| Orin1 | nvidia | 192.168.41.2 | Dedicated | Walker Tienkung · Voice & Vision / Walker Tienkung · Embodied Intelligence |
| Orin2 | nvidia | 192.168.41.3 | Dedicated | Walker Tienkung · Embodied Intelligence |
The following Wi‑Fi configuration and login steps use the motion‑control x86 controller as an example.
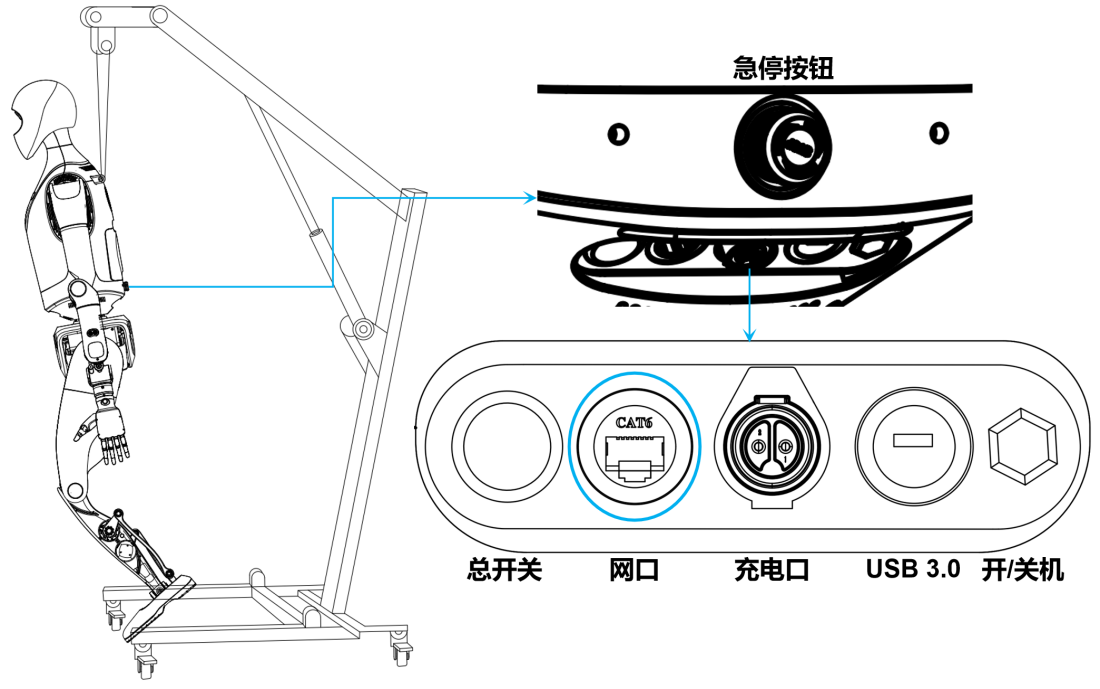
- Wi‑Fi configuration steps:
-
Connect the debug Ethernet port on the back of the robot to the user’s PC with an Ethernet cable.
-
Configure the Ethernet interface on the PC to
192.168.41.xx/255.255.255.0. On Windows, for example:- Open “Settings” → “Network & Internet” → “Ethernet”, then click “Edit” to modify IP settings.
- Enable IPv4 and set the IP address to
192.168.41.xxand subnet mask to255.255.255.0.
-
Open any terminal and run
ping 192.168.41.1. If the result is similar to the illustration, the network connection between the PC and the x86 controller is normal and you can proceed to login. -
In the same terminal, run
ssh ubuntu@192.168.41.1, then enteryesand the login password. If the prompt matches the illustration, you have successfully logged in to the x86 controller. -
In that terminal, list available Wi‑Fi hotspots and record the SSID of the target Wi‑Fi:
sudo nmcli device wifi list -
Connect to the Wi‑Fi network using its SSID and password:
sudo nmcli device wifi connect 'Wi-Fi SSID' password 'Wi-Fi password' -
Run the following command to check the current configuration and status of the wireless interface, and confirm that it has successfully connected to the target Wi‑Fi network. At this point, Wi‑Fi configuration is complete and you may unplug the Ethernet cable.
ifconfig
- After Wi‑Fi is configured, you no longer need to reconfigure it each time. To connect to the x86 controller via Wi‑Fi:
-
On the user’s PC, open any terminal and run:
ifconfigCheck the IP address assigned to the wireless interface (
wlan0/wlp2s0), and record the IP shown after the corresponding field. -
Then run:
ssh ubuntu@x.x.x.x # x.x.x.x is the IP obtained in the previous stepto connect directly to the x86 controller. Enter
yesand the login password to complete the login.
Standing on the Ground
Please ensure that you have initiated the self-check by short pressing the A button on the remote control. The robot will only respond to the D button after the self-check is successful.
Operating steps:
-
Press the D button on the remote controller to move the robot to the zero (initial) pose.
Note: Before pressing D, the robot must be fixed on the protective stand.
-
Use the protective stand to slowly lower the robot until its feet touch the ground, and keep it upright for 60 seconds.
-
Ensure that the H lever on the remote controller is in the middle zero position, then long‑press the A button to make the robot stand. After standing, check whether the robot is balanced (no shaking or forward/backward tipping). If it is not stable, repeat the above steps and try again.