9. Basic Motion Operation Instructions
It is recommended to operate the robot with the protective stand supporting it.
Functions in Reinforcement Learning Motion‑Control Mode
Locomotion Mode Switching
-
Enter stepping mode
- Confirm that the robot is in the stand state.
- Move the H lever on the remote controller from the middle position to the left, then back to the middle. The robot enters in‑place stepping mode.
-
Switch to running mode
- Ensure the robot is in a stable stepping state.
- Move the H lever from the middle position to the right, then back to the middle. The robot switches to in‑place running mode.
-
Movement and turning control In stepping or running mode, you can use the joysticks on the remote controller to move and turn the robot. The amount of deflection determines the speed:
- Push the left stick up or down: move the robot forward or backward.
- Push the left stick left or right: move the robot sideways left or right.
- Push the right stick left or right: rotate the robot counterclockwise or clockwise.
-
Stop and return to stand
-
In stepping mode:
- Ensure the H lever is in the middle zero position, then long‑press A. The robot stops moving and returns to stand.
-
In running mode:
- First move the H lever from the middle position to the left, then back to the middle to switch back to stepping mode.
-
Warning: Do not press or long‑press the A button directly while in running mode.
Emergency Stop Methods
Warning: If the robot is not supported by the protective stand, performing the following emergency operations may cause the robot to lose balance and fall. Proceed with caution.
-
Stiff stop
In the following situations, press the C button on the remote controller immediately. All joints will enter a stiff stop state, and the robot will no longer be able to maintain balance, so physical support is needed to prevent it from falling:
- Abnormal motion that does not match expectations (e.g., wrong speed or direction).
- Potential risk is anticipated (e.g., the robot is about to approach obstacles or people and cannot be stopped in time).
-
Joint disable
In the following emergencies, simultaneously move the G lever on the remote controller to the right and press C. This disables all joints. Power to the joints is cut off, and the robot will not be able to maintain posture and will immediately collapse:
- Sudden robot fault (e.g., sensor or electronic component failure that may cause further damage).
- Unstable robot posture (e.g., dangerous position or angle that may lead to a fall).
-
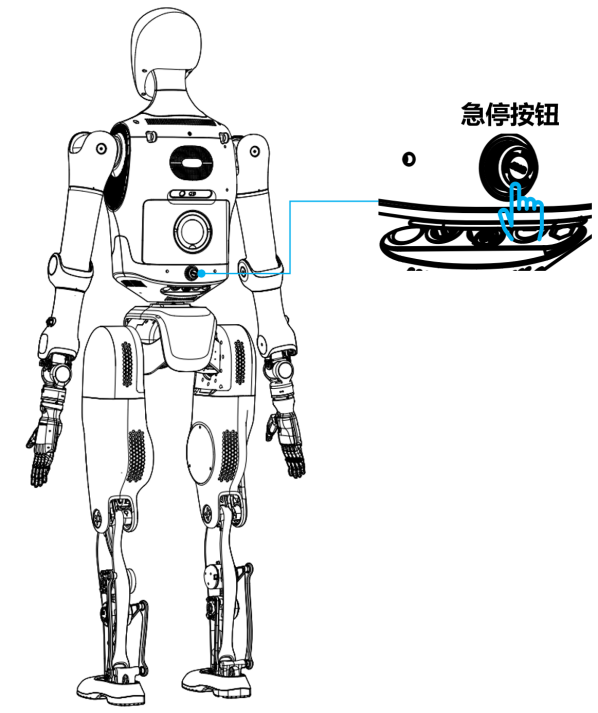
Emergency stop button
In critical situations, press the emergency stop button on the back of the robot immediately. The robot will lose all posture control and collapse. Then long‑press the power On/Off button for 6 seconds, and finally press the main power switch to cut off all power.
Typical cases:
- Smoke or burning smell from the robot.
- Water or other foreign objects entering the robot.
- The robot is out of control and cannot be stopped via the remote controller or other means.
- Robot damage that may cause further danger.
- Emergency situations such as high‑altitude work or dangerous environments where control is lost.
- Sudden external events such as earthquakes, fires, etc.
After completing the above emergency power‑off operations, you must restart the robot from the beginning according to Starting the Robot.
By following these emergency procedures, you can respond quickly in various situations to ensure the safety of the robot and its surroundings.
Shutting Down the Robot
When shutting down the robot, follow these steps:
- Confirm that the robot has stopped moving and returned to the stand state.
- Press the C button on the remote controller to enter the stiff stop state.
- Fix the robot on the protective stand and lift it.
- Press the emergency stop button; the Power On/Off button indicator turns red.
- Long‑press the Power On/Off button for 6 seconds; the indicator turns blue.
- Press the main power switch; all indicators should turn off.
- On the remote controller, short‑press and then long‑press the power button to power off the controller.
Repacking the Robot
To repack the robot into the flight case:
- Ensure the robot is powered off and properly suspended on the stand.
- Align the flight case with the robot’s facing direction.
- Lower the stand so that the robot’s legs are placed into the flight case and are in contact with the protective foam.
- Remove the safety rope, then guide the robot’s upper body and head into the flight case so they rest against the protective foam. Adjust the arms and decorative hands as needed during placement. For transport, it is recommended to remove the dexterous hands (as in the factory configuration), place them in their dedicated transport bag, and then put the bag in the flight case.
- After confirming everything is correct, close the flight case, rotate the butterfly latches to lock the square locks, and secure the case.
Battery Charging
Charging Notes
- The robot supports direct charging. Before charging, power off the robot completely. Disconnect the charger promptly after full charge to avoid prolonged connection.
- Charging environment temperature should be 0–30 ℃, with humidity ≤ 75% RH.
- Use only the original dedicated charger provided by the Company. Do not use third‑party power supplies.
- Spare battery packs are recommended to be stored in dedicated explosion‑proof battery cabinets.
- Allow the robot to cool to room temperature before starting charging.
- If smoke, unusual odors, overheating, or deformation occur during charging, unplug the charger immediately and stop using the product.
- If electrolyte comes into contact with the eyes, rinse with clean water immediately and seek medical attention.
Charging Methods
-
Direct charging on the robot
- Connect the power adapter to a wall socket.
- Insert the adapter’s charging plug into the charging port on the robot.
- When the adapter indicator is red, charging is in progress. When it turns green, the battery is fully charged and charging should be stopped to avoid overcharging.
-
Battery compartment hot‑swap
- Prepare a spare battery pack.
- With the robot powered off, rotate the battery compartment latch to the right and pull out the battery pack.
- Insert the replacement battery pack into the compartment. While inserting, rotate the latch to the right, push the battery fully into the compartment, then return the latch to the neutral position to indicate successful installation.
-
Charging the battery pack
- Connect the power adapter to a wall socket.
- Connect the power adapter to the battery pack. When the adapter indicator is red, charging is in progress. When it turns green, the battery is fully charged and charging should be stopped to avoid overcharging.
Diagnostics and Operations Guide
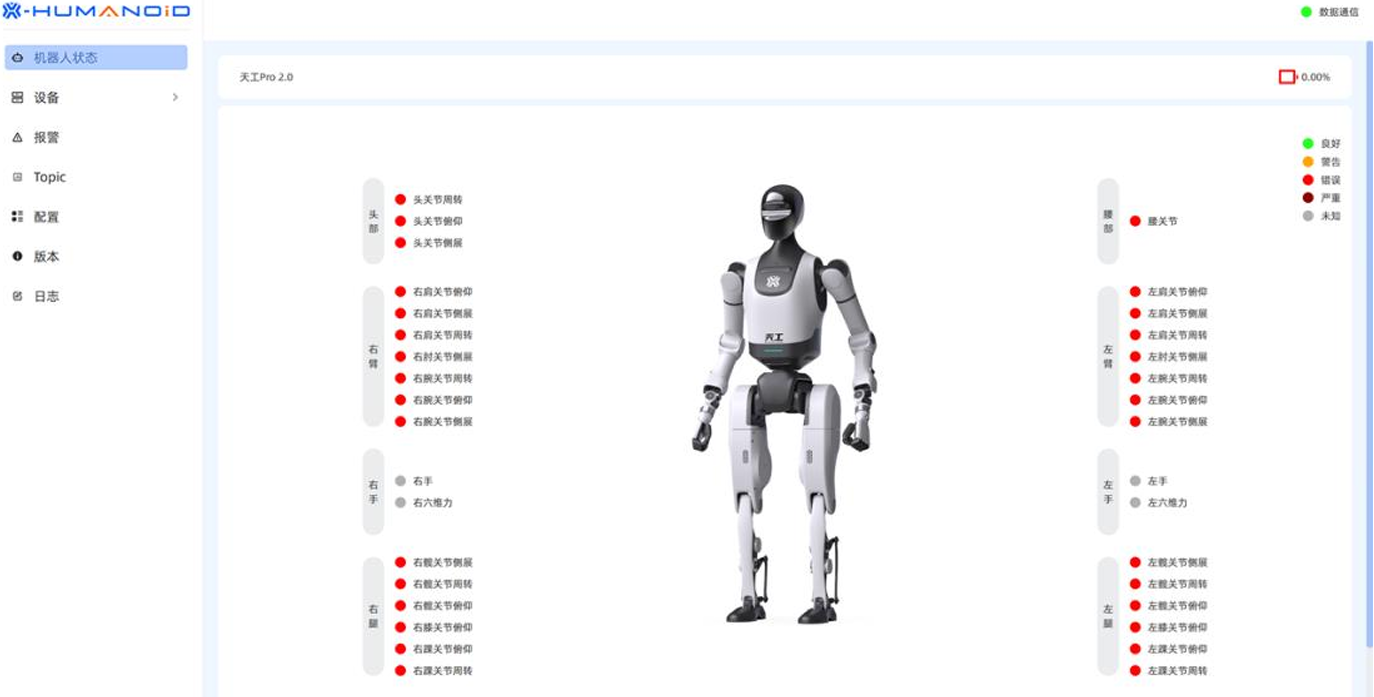
Walker Tienkung includes an integrated diagnostics and management platform that uses WebSocket connections for remote monitoring and operation. The platform displays status information for all robot components, including joints, IMU, power, batteries, and more, as well as version and system information. Users can also view live topic data from the robot system and use convenient update buttons to keep information synchronized, ensuring the device operates in optimal condition.
Access URL
After obtaining the x86 controller IP address, append port 8080 to access the diagnostics platform, for example:
192.168.41.1:8080
Robot Status
- The Robot Status page uses color indicators to show the status of each joint and the current battery level. Refer to the legend in the top‑right corner for the meaning of each color.
- The communication status indicator in the top‑right corner shows the WebSocket connection status: red indicates disconnected, green indicates normal connection.
Devices
- The Devices page displays the robot’s basic information, current version information of each component, and detailed system information for each main controller.
- By clicking the Connect button and entering a Wi‑Fi SSID and password, users can connect the robot to a Wi‑Fi network and obtain IP addresses for each main controller.
Joints
- The Joints page lists detailed information about each joint. Click Refresh on a row to update that joint’s data. Select multiple rows and click Bulk Refresh to update multiple joints at once.
IMU
- The IMU page shows detailed information for each IMU. Click the corresponding Update button to refresh that IMU’s data.
Power
- The Power page shows detailed information for each power channel. Click the corresponding Update button to refresh that power data.
Battery
- The Battery page shows detailed information for each battery. Click the corresponding Update button to refresh that battery data.
Remote Control
- The Remote Control page shows detailed information for the remote controller on the left. Click Update to refresh the controller data.
- The control panel on the right is expanded by default and can be collapsed by clicking Control Panel. Clicking an action button sends the corresponding command to the robot. This function requires the robot to be in the stand state and the E lever on the remote controller to be in the up position.
Sound Card
- The Sound Card page provides detailed information about the sound card and audio files.
- You can play or delete an audio file by clicking the Play or Delete button for that file.
Alarms
- The Alarms page shows detailed alarm information. Click Clear All to clear all current alarms.
Topics
- The Topic page shows detailed topic data. Click Update to refresh a single topic, or Update All to refresh all topics.
- Clicking on a topic row displays detailed data for that topic in the right‑hand panel.
Versions
- The Versions page shows detailed device version information and firmware upgrade status.
- Only items with a blue Upgradable button in the top‑right corner can be upgraded. Click Upgradable, then select or drag‑and‑drop the upgrade package (only
.tar.gzis supported), and click Start Upload. - After a successful upload, click Start Upgrade to begin the upgrade.
- If the interface shows the warning “waiting estop pressed”, press the emergency stop button and then twist it to release before continuing.
- When an “upgrade successful” prompt appears, the version upgrade is complete.
Logs
- On the Logs page, click Get Logs to download system logs, kernel logs, application logs, and bag logs for the selected time range.
- After loading is complete, the final URL on the page can be used to download the selected log archive.